Friday, 24 February 2012

Crafty Bums

Just thought I'd do a quick post about the website crafty bums.co.uk which has this cushion of mine as a featured item today. The website is a place to buy all manner of handmade delights made by crafty bums and crafty mums all over the country. We all got together on a baby website forum and shared our crafts with each other and then a few of the chief crafty bums got together and created this wonderful site. The bums are a really great community and share a wealth of advice and knowledge from practical crafting tips to advice about setting up in business and all the serious, boring stuff that goes with it.

 This cushion is available to buy for £15 and id double sided.  One side of the cushion has 3 rows of cute gingham bunting stitched on to crisp white cotton. The other side is a patchwork of the same gingham fabrics.
Here is are some great items from a fellow Crafty Bum Betty Octopus. Bum pin cushions. Amazing.

Cosy Toes / Foot Muff / Pushchair Liner

So, I bought the fabric to do this about a month ago but as always my 'to-do' list is longer than my arm, but thought I better get a move on before it gets too warm! I was putting it off because it seemed like it might be a bit of a challenge.
Before I started I'd had a look at various foot muffs in the shops and thought about what I would like mine to be like. Then after I had already bought the fabric, my sister in law came to visit and lent me hers to use. I used it a few times and this was really useful because then I got to find out what I did and didn't like about it and what I could change to the design I had in mind for mine.
One of the features I wanted for mine was for the cover bit to be completely removable. I used 2 open ended zips to enable this. This way it can be opened up from either side and also be taken off completely, plus two quite long zips are more easy to come by than one mega long zip!
 The other thing that had annoyed me about the other one was that it just flopped off the seat all the time when I had the frame upright when not in use. (I have a Bugaboo Frog and not much hallway space so we always take the frame off the wheels, hang the wheels on the wall and prop up the frame part in the narrow hall). To combat this, I added an extra 'sock' layer to the back of the foot muff at the top and bottom which slips snugly over the frame and holds the whole thing on securely as shown in the next two photos.
 To finish the edges of the holes I made for the straps I stitched bias binding around them. This was actually the most fiddly and time consuming part of the whole thing, and there are six of them.

Once I actually got on with it, it didn't take as long as I'd thought it would, but then I had thought the worst and had been putting it off for months. Here is a picture of my little family out for a walk in the woods, luckily I finished it just in time for the snow.

Saturday, 11 February 2012

Mens Sports Snood

My husband is a golf coach and has to work outside all year round - even in this snowy weather we are having. He came home on Thursday night and asked me to make him a men's snood. This seemed really easy and so this morning I got to work.  I had a bit of black fleece fabric left over from the foot muff I am currently working on for my little boy's pushchair (more on that on a later date when I finish it). I also had a bit of black elastic and a little toggle too. I've usually got everything I need to take on a project as I am such a hoarder.


It didn't take very long as fleece is really easy to work with because it doesn't fray.
The snood can be worn a number of ways, as a neck warmer like some footballers wear for practicing, up over half the face, great for cyclists. Also if you pull the drawstring tight it can be worn as a beanie hat. 
Here is my gorgeous husband modeling it

Tuesday, 7 February 2012

Paisley Bandana Dribble Bibs for Babies

I make these lovely dribble bibs for babies and toddlers that are made out of real bandanas. My little boy wears them all the time. He just turned one on Sunday and although I can't see any signs of any more teeth coming through, he is dribbling loads at the moment so it's great to have a stash of these bibs and people always comment on how cool he looks in them.
 The bibs are available to buy on this fantastic new website craftybums.co.uk which launched last wednesday. As I said they are made out of real bandanas, the upper is 100% cotton and they are lined with absorbent ant pill navy fleece. There are 2 metal snap fasteners to adjust to your growing child. 

Wednesday, 1 February 2012

Sky Scarf so far

Here is my sky scarf so far. I look at the sky at 12 noon every day and then knit my row. I chose  12 o' clock because it is 2012 and I really felt I needed to do it at the same time every day. Having started though, I have really noticed how much the colour changes throughout the day, even at 12:15 it could be a different colour. So it doesn't really reflect the general weather conditions of the day. I could look up at 9am and see dark grey clouds and think that I'm gonna have a dark grey stripe, but then by noon the sky is bright blue and not a cloud in sight.
My husband thinks I should have chosen evening or early morning to look as then I would get a wider range of beautiful colours from the sunsets or sunrises and although I did consider this, I thought that 7 o'clock would be dark for a lot of the year, but there would be some interesting deep blues I suppose. 
We'll see how I get on with this one and maybe I'll do another one next year. At the moment I am loving this project and look forward to doing it every day as it only takes 3 or 4 minutes and there is no pressure to finish anything.

Sunday, 29 January 2012

T-shirt into Babygrow

This was actually my first make of the year but I only finished it last night. It is a gift for the soon to be born baby of my friends Jen & Mike who among other things are Hot Breath Karaoke. I made it out of one of their own T-shirts that my husband won at their karaoke night.
I used sewing pattern Butterick 5896 to make it up. I used the T-shirt for the main body but had to use extra fabric for the sleeves as the T-shirt was only a small. I have made babygrows and vests from T-shirts before. Once I got the dungarees, a long sleeved top and the hat all from just one XXXL T-shirt.
I had been putting off finishing it when I got to the snaps as I have to use a hammer so can't do it when my boy is sleeping and if I try and do it when he's awake, he won't leave me alone and just wants the hammer and the components. But recently I treated myself to these pliers. Here they are in my tin of fastenings etc.
They make the job so much easier and silent. Just a little squeeze and hey presto a press stud! 
I am really pleased I bought them, I don't know why I didn't get a pair sooner.
Now I just have to wait until he or she is born, and hope that they are a tiddler because I accidentally cut out the smallest size without checking. 

Saturday, 28 January 2012

Bath Toy Bag & Laundry Bag

My baby boy got so many new bath toys for Christmas that the edge of the bath just wasn't big enough any more. I needed to make something to store them in and had loads of this sports mesh fabric in my stash which hopefully will be perfect for all of those wet toys. 
It was really easy to make. I just cut a rectangle of fabric and stitched this beautiful stripy bias binding which I found at a bootsale at either end to make a tunnel for the drawstring. The cord is just from one of those duffle style carrier bags.
 Then I tied it to a rail under the boiler cupboard and as you can see, there's still plenty of room for more toys!
Next I made a laundry bag for his room out of similar sports mesh but this time in bright green. I used an offcut of the fabric I used to make his curtains at the bottom of the bag. Again I sewed on bias binding to make a tunnel but this time I poked curtain wire through and joined the ends up with a split ring to hang from a hook.

Friday, 27 January 2012

New Fabric and New Books

I've bought some lovely new fabrics
 and received some lovely new books.

Wednesday, 18 January 2012

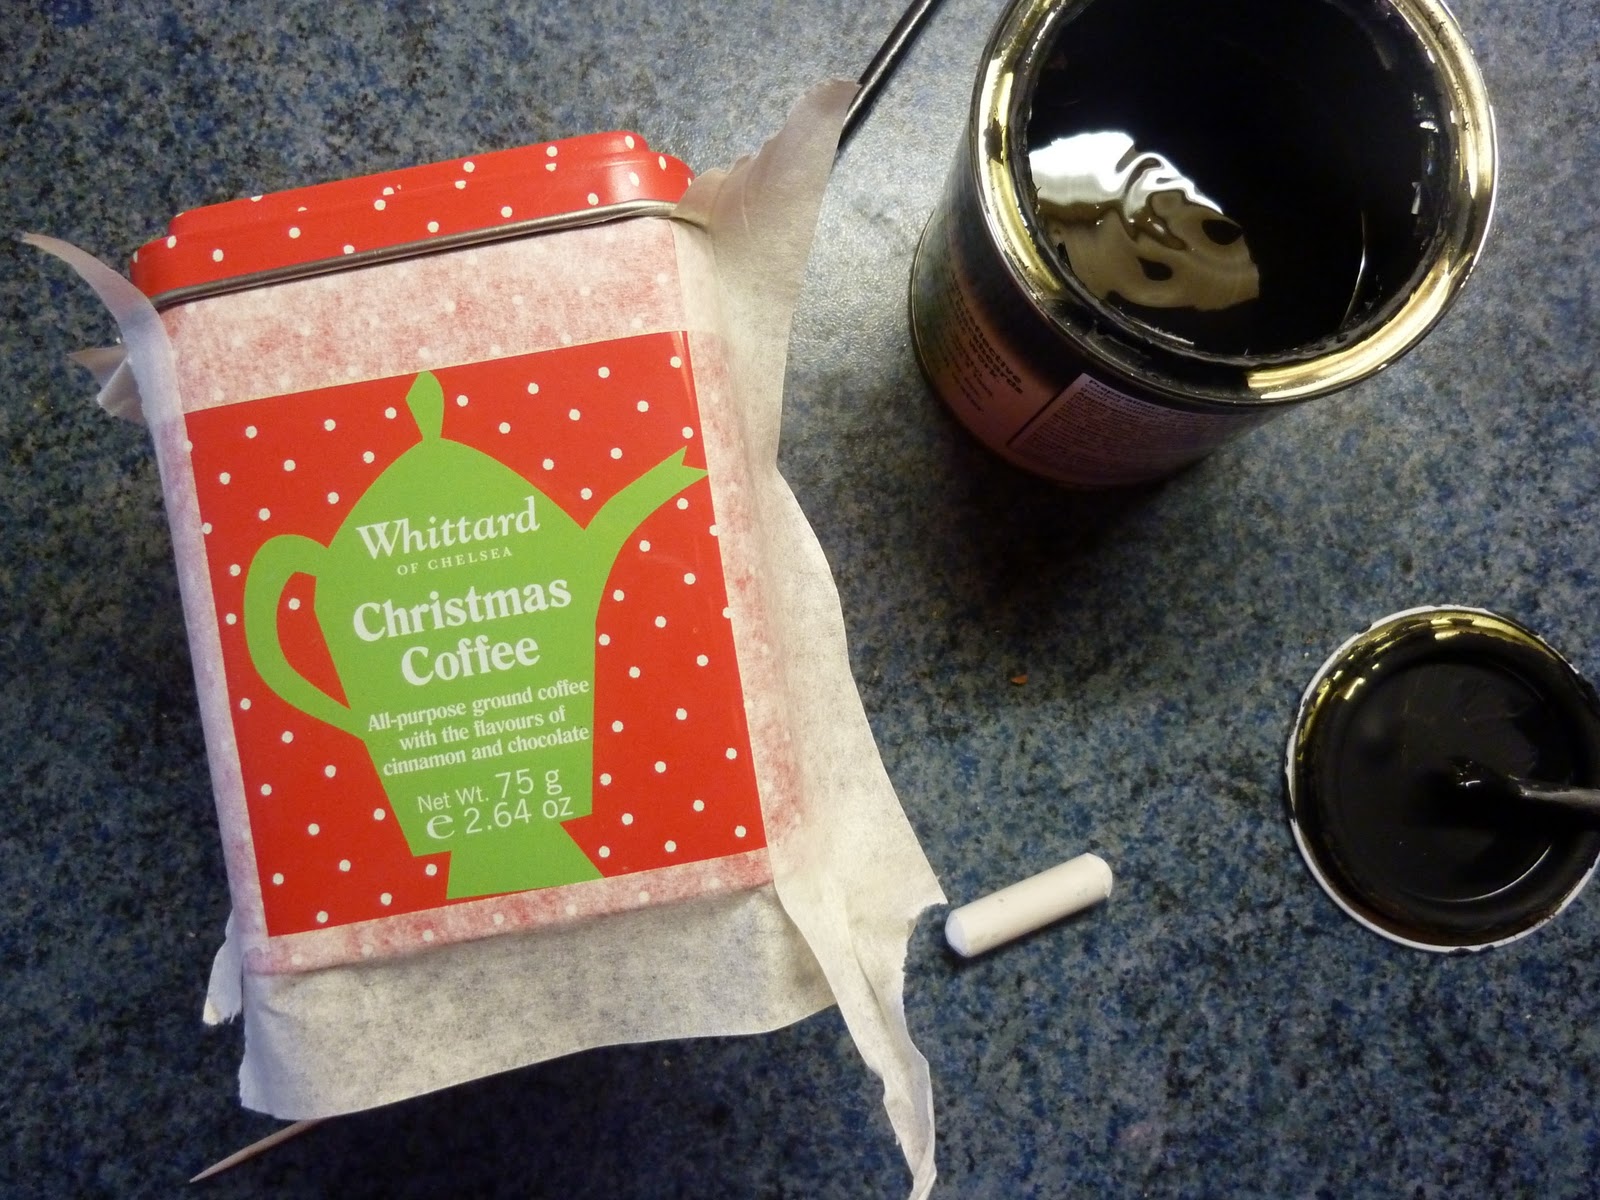
Coffee Tin Re-Vamp

Sometimes I'm in the middle of doing something mundane, like wiping the kitchen surfaces when I have an idea and then just grab the things I need and before I know it, I've done it.
These little tins of tea, coffee and hot chocolate are too cute to throw away and I've had my eye on them for a while just waiting for my husband to finish drinking the contents so I can have them. 
As cute as they are, I wasn't keen on the label on the front. So the other day I suddenly thought about painting over them with blackboard paint. I wasn't sure if it would work so decided to just paint a bit on to try it, but before I knew it, I'd got the masking tape out and was going the whole hog. 
 I masked around the biggest points of the teapot design and then just painted the blackboard paint on and dried them with a hairdryer as I couldn't be bothered to wait. Then just peeled of the tape and they were all finished. 
At the moment they're still full of their original content but when they're empty they can be used and re-used for all sorts of other bits and bobs which can be easily labeled again and again and in the meantime they look nice where they are.

Sunday, 1 January 2012

Sky Scarf Project for 2012

Happy New Year.
I have decided to do this Conceptual Knitting project. I had seen it on the internet last year and thought it was a brilliant idea. But this morning I was reminded of it by fellow crafters online and decided that I would give it a go. 
Basically, it is a year long project wherein you knit a scarf, two rows a day, in the colour of the sky on that day. I have slight OCD and so a project like this has to be started at a good time and 1st January seemed like the perfect time to begin. Obviously I didn't have time to go out and buy yarn but luckily as I'm such a hoarder, I already have all the colours I think I'll need.
In the process I have also joined Ravelry, so that's another website to eat up my crafting time by looking at more things I want to make. Luckily I'm not too much of a knitter, but this project is just done in simple garter stitch, so really even the most inexperienced knitter should be able to give it a go.
There is a group on Ravelry of knitters all over the world who are taking on this project and they are adding their pictures to Flickr
One lady said that she was casting on 46 stitches because that's how old she is while she's knitting it, I like that idea so I have pinched it and done the same (not 46 though!).
I will post updates of how I'm getting on, hopefully I won't abandon it like all my other knitting projects, seeing as it's only a row a day, I should be able to find the time...

Saturday, 24 December 2011

Wreaths, wreaths, wreaths.

Took me a while to finish this other wreath project; a Christmas card peg wreath. I had seen it on Pinterest and it looked fairly straight forward. You just need wooden clothes pegs, a wire hanger, pony beads, green paint and ribbon. I went and bought a pack of clothes pegs for next to nothing, had some green acrylic paint which I thought I'd use instead of shelling out for spray paint. Also I only had enough white pony beads to do it, so I was going for more 'mistletoe berries' than 'holly berries'
You can follow the tutorial I used here. I got my wonderful husband to help me paint the pegs one evening, like I said, we used paintbrushes and acrylic paint instead of spraying them so it did take longer. When the pegs were dry I clipped the pegs on the hanger alternating with the beads. The hard part was trying to get the wire into a circle and getting the pegs to all lie flat and the right way round so I could tell if they were evenly spaced. I used tape to stick the wire ends together and then discovered I didn't have a decent piece of red ribbon ( I didn't want to use the gingham again), so I whipped up a little padded bow with left over fabric from the Christmas bunting. As you can see, my circle is a bit wonky, but it does the job... 
As long as we don't get too many cards!

Wreath Number 3
I had to give it a go! Having made my wooly wreath for the front door, I still wanted to have a go at a pillow wreath. I'd never seen one before, but earlier this year I saw one at the Roding Valley Quilters exhibition in Chigwell. It looked simple enough but really impressive. I had some Christmas fabrics left over from the bunting and a few more bits of greens and tartans. 

I didn't have time to get a polystyrene florist ring so I made one out of scrunched up newspaper and tape and then covered it in green. My ring turned out about 7 inches in diameter, quite small as I want to put a pillar candle in the middle as a centre piece for the Christmas table.

  •  I cut out a load of 5 inch squares of fabric, I had no idea how many I'd need so I cut 30, this turned out to be just right. 
  • I folded and pressed a seam allowance of about 6mm on one side, this saved me loads of fiddling when I'd come to hand stitch the ends. 
  • Then I sewed up the two other sides and turned them all the right way round. 
  • Next I stuffed them with toy filling and sewed the pressed under edges together by hand. When I had a pile of 30 little pillows it really looked like I had way too many for my little paper ring. 
  • Using green yarn I tied the pillows in the centre and then tied them to the wreath. Each time I attached another, I just positioned it so that it covered more of the green paper and looked like they were all going in different directions.  I didn't cover the back because it will be place on a table.
  • I trimmed all the loose yarn and placed a pillar candle in the centre and ta-da!
I would much rather make another one of these than the peg wreath. I found it quicker and easier, but maybe that's just because I love sewing.

If you are going to make one, I should say that it probably isn't a good idea to light the candle in the middle as the filling in the pillows is probably highly flammable. I shan't be leaving it unattended if it does get lit this festive season.


Saturday, 17 December 2011

A Woolly Christmas

It feels like this Christmas I have gone pom pom crazy. But they are so versatile and great fun to make. I wanted to make a wreath for our front door and couldn't decide whether to make a rag wreath, pom pom wreath or pillow wreath. At the quilting shop round the corner they have loads of rag wreaths in the window. They look fantastic which made me think I might be disappointed if mine didn't turn out so good. When we got our Christmas decorations out of the cupboard there was a small bag of pom poms I had made a couple of years ago when we didn't have any decorations, they were quite cute. This made me decide to make a pom pom wreath.
I used four shades of green yarn, mainly double knit acrylic. Bottle green, khaki green, bright green and mint green. Using multiple strands at the same time makes making the pom poms loads quicker. I made 14 pom poms using the large pom pom maker in my Japanese set. Then I ran out of one of the greens so this determined the size of my wreath. I got some thickish wire and threaded it through the pom poms as if they were beads. As I did so I pushed them together quite close so that you could no longer really see the ball shapes of the individual pom poms. This made a really nice dense effect that I had not been expecting. I decided to keep them tight together which meant my wreath was to end up quite small. I twisted the ends of the wire together and covered it with a pretty gingham ribbon loop and bow. Then I trimmed all the stray bits of wool, it was a bit like wooly topiary with green fluff everywhere. I hung it on our front door where as you can see compared to our door knocker, it is quite small - but I think it's cute.


Here's some more pom pom Christmas joy. I saw these on a blog and couldn't resist having a go myself as I have some dolly pegs in my craft stash. 

First I painted the hair and face, clothes and shoes on the peg with acrylic paint. I used a really fine brush to do the face and jewellery details. For the skirt I decided to use a mixture of textures. I used a couple of different thicknesses of white yarn and cut long lengths from each ball so that I could wrap four strands instead of just two at the same time. I used red lurex glittery yarn as well to dot the 'skirt' with red to match the jewellery I had given my peg. Lying on my craft room floor was also some scraps of white tulle so I cut that into long strips and wrapped them round at the same time as the yarn. I had to be careful not to overfill the pom pom maker so that I could still get the peg through the middle. Then you just trim and tie off the pom pom as normal and it is nicely tied to the peg. I didn't give her wings as she isn't really a fairy. I have posted her to my friend Holly instead of a Christmas card. I hope she doesn't get attacked by Arnold, Holly's cat.


Decoupage Round Box

I am such a hoarder I can never throw anything away. I keep all sorts of things thinking that one day I might do something with them. Nice boxes are far too useful to throw away and I've been meaning to have a go at covering this round one that I got some hair products in last Christmas. 
I forgot to take a before photo, but it was gold with branding on the lid and the contents etc on the base. Choosing the paper was the hardest part, probably why it takes me so long to get round to things. I had bought a pack of vintage Christmas wrapping papers from a local charity shop back in the summer and only recently opened the pack to have a look. I really love this one which reminds me of Scandinavian knitwear.

First I painted it white all over the outside. I cut some of the wrapping paper to size and then when it was dry, painted the box with slightly watered down PVA glue. I carefully wrapped the paper round the box and then smoothed it down as best I could with the paintbrush which had a little of the glue on. When it was dry I carefully cut around the eyelets in the side with a scalpel and threaded the braid handle back through.
I will definitely be doing more of this in the not too distant future... as long as I can make a decision of what to cover and what paper to use.


Sunday, 11 December 2011

Bunting Galore

Before I made the pom pom curtain, I made some lovely Christmas bunting. I had bought lots of different Christmas fabrics in mostly reds and greens. I love making bunting and have made quite a lot lately.

I made a length of about 12' to hang in our living room, it looks lovely and I can use it every year, unlike the pom poms which somehow I don't think will be able to remain untangled once they come down.
Here is some more bunting I have made recently, both for newborn baby girls born in November. First is for baby Penelope or "Nel". I used lovely patchwork print fabric in blue, pink and brown and machine appliqued the lettering on in blue, pink and brown fabrics.

And some more for my cousin's daughter Nancy Jean. I immediately thought to do the lettering in a soft denim for "Jean" and think it looks good against the red and white spotty fabric of the flags. I chose red because Nancy in 'Oliver' always wears a red dress.

And some more for my cousin's daughter Nancy Jean. I immediately thought to do the lettering in a soft denim for "Jean" and think it looks good against the red and white spotty fabric of the flags. I chose red because Nancy in 'Oliver' always wears a red dress.